Dark Record Cabinet

So let me just start this post by saying this may be my last flip before baby H comes!  What-the-wha??? I can’t believe I’m saying that - is this really happening?!  I think she just heard me because she’s elbowing me right this very minute as if to say “Yes mom.  Ready-or-not here I come.”

Since it could take a while for me to get back in the workshop, I do hope this flip will suffice for a while.  Let’s meet this capsule project shall we? 

FullSizeRender.jpg

He was a whopping $10 and had really only known life as a printer cabinet as evidenced by the shreds of hammermill paper wrappings and wedged paper clips in the drawers. 

FullSizeRender.jpg

He was a little low but made of solid wood with good bones and I knew I really wanted to see it become something special. Between the drawers and the cabinet, he has a lot of versatile storage so I began to see him as something worthy of a suave bachelor pad or the glossy pages of a West Elm catalog…

IMG_0504.JPG
IMG_0509.JPG

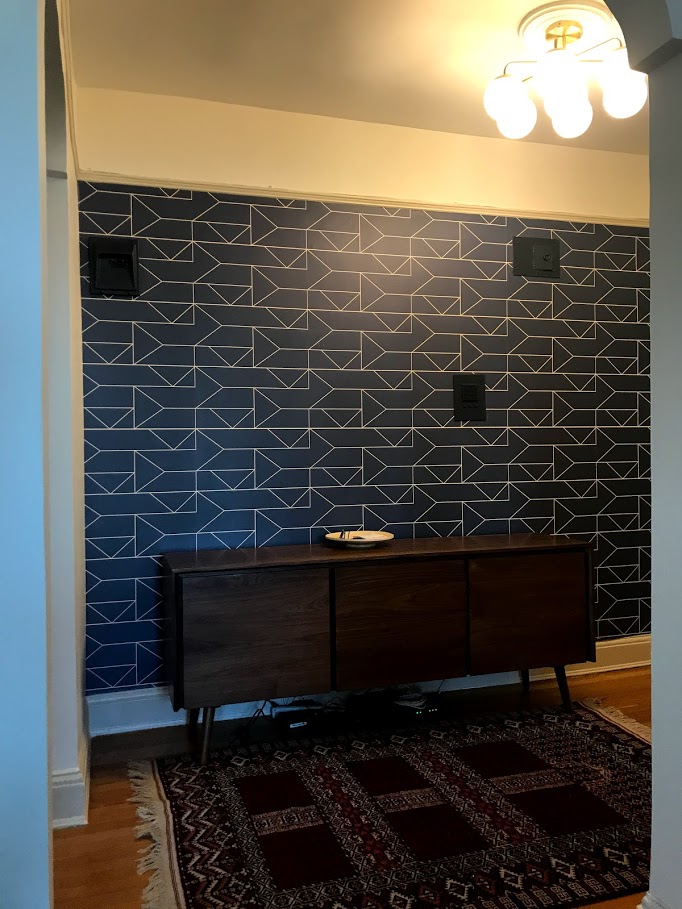
You guessed it - I resurrected our old favorite inky blue/ black color “Black Boudoir” for a moody chalky finish.

IMG_0506.JPG
IMG_0512.JPG

I added some “jewelry'“ to this piece in the form of sleek finger pulls and brass tapered legs.

IMG_0511.JPG
IMG_0507.JPG

That hardware matches the gold gams perfectly.  Yum.

IMG_0508.JPG

Fun fact - those pulls were actually leftovers from this project.

IMG_0513.JPG

The simple sleek design lent itself well to some more masculine styling so naturally I decorated with music and booze... bow-chicka-bowow!

IMG_0517.JPG

I kept my favorite monochromatic formula of warm terra-cotta, a touch of leather, and some plant life.  Oh and a simple nod to our first born… Thor.  He doesn’t even KNOW what he’s getting into with a little sister on the way.

IMG_0516.JPG

The interior of the cabinet has a shelf that could easily fit a tabletop record player when not in use. Or your good booze if that’s your thing.

IMG_0514.JPG

And the large bottom drawer fits standard LPs.

IMG_0515.JPG

So here he is! My last pre-baby flip (unless she comes late and I need to crank something out in hopes of inducing - ha!).

IMG_0505.JPG
 

Dark Record Cabinet
Now available for sale
39”W  x 16” D x 29” H
$495

If you are interested in this piece or a custom order like it, email me at cate@stylemutthome.com for purchasing and shipping options.

IMG_0224.JPG

SMH in NYC: eDesign Project Update

Today’s the day for more PROGRESS!! I told you friends last week I wanted to start sharing and celebrating design project progress with you more often on here, so here we go again!

This apartment is in NYC right by Prospect Park. I can’t tell you how much I adore these clients, (and their sweet pup, who you’ll see with her friend in some of the pics)! When they gave me the initial walk through via video chat, it was love at first sight. Those arches, those windows, that molding, the floor! It’s different architecture than I’ve ever had the privilege of designing within before, so I was excited about that from the get-go. Take a look at these ‘befores’, (all photos in this post were taken by the client)!

BEFORE

d19662abb9a0f23ee8d3284c4fca7c1b.jpg
c12de709487ca9924ca7a340bbc513de.jpg
0764d5fdab278dc01bd5bd3602d24379.jpg

This is actually a 4-room project: Entryway, Living Room/Dining Room, Office and Master Bedroom. This fun couple has traveled quite a bit and accumulated a collection of artifacts and pieces from around the globe. They expressed interest in doing some unique things in their home which I was really excited about! It’s always fun to work with others who have a vision and enjoy wandering off the beaten path a bit, stylistically. The trim was one of the first elements we discussed as an opportunity to do something a little different! I chose Swiss Coffee for the walls, (a StyleMutt Home favorite), and Clay Beige for the trim, (both by Benjamin Moore).

I am going to wait to detail out here the pieces we’ve selected, but it’s getting there! Now the space is ready for the next phase of it’s makeover - built-ins! I’ve been in touch with their contractor working on a built-in shelving design that will work with the structure of these walls. The TV will sit in the middle of the shelves and we’ll have hidden storage cabinets under the shelves…I absolutely cannot wait, it’s going to look SO GOOD!

PROGRESS

Hi, Nala and pal! Those faces…

Hi, Nala and pal! Those faces…

The hallway was papered by the previous owners, and while the idea was splendid, the paper was not making any particular statement, (it was white and had a grayish swirl pattern on it). We loved the idea of something really bold that you’d see beyond the living and dining area, and this navy geometric does not disappoint. In a home that does not have an open floor plan whatsoever, one way to expand the size of any room is to draw the eye beyond the walls of the space. The images below are a perfect example of this!

IMG_9813.jpg
IMG_9794.jpg
IMG_9791.jpg

We are working on selecting art, various rugs for the hallway and office, final details for the bedroom, and then we’ll have some shelves to style! We are using a very large triptych the client found from a street vendor in India over the sofa - oh my gosh, it’s going to be amazing.

IMG_9806.jpg

Here is the rendering we used to show them the vision - cool piece, huh!

Living Room Design Board.png

It reminds me a bit of when we used Ali’s Cambodian photograph over her own living room sofa, and then when she moved, over her dining nook banquette! I just adore large-scale pieces - especially when they have deep meaning to the client!

So we still have a ways to go, but this is some progress, isn’t it! The paint on the walls and trim is making me so ridiculously excited. I’ve never done white walls with beige trim before, and truth be told, there wasn’t a ton of inspo I could find as an example, But it just felt so right for this home and now seeing these progress shots they sent is giving me so much encouraging confirmation. I’m in love! It’s sophisticated and subtly dramatic - the perfect canvas for a home to a couple of globe trotters.

IMG_9816.jpg

We are in cahoots over here on the finishing details for this beautiful home, and I am busting to share everything with you here and now….but I’ll refrain. Gotta save some surprises! Just wanted to share this exciting project in the works now because it’s making me too giddy to keep to myself any longer! I can’t wait to visit NYC soon to hug these fabulous clients and take all the fun pictures to share the final reveal with you! It’s going to be a good one, friends.

As always, I’m so grateful to you for coming by today!

Family Room Refresh

Hi there! Gonna do my best to keep this one brief! We’ve lived in this house, (our first!), for quite a few years now - going on 9, actually! Our home has always been my ‘canvas’ of sorts to try new ideas and learn more about how I want our home to feel - both to us and to those whose company we get to enjoy within these walls. Our family room is in our basement, but it’s only partially underground so we do get some good light down here! It’s got some weird quirks, like an old brick hearth from a previous owners wood stove, and a 12” ‘bump out’ that provides extra insulation where the space is underground. But I love brick, I love wood, and I love built-in shelves! Until recently, I hadn’t touched the shelves flanking the brick:

5 years ago:

before.jpg

This winter I was feeling the need to wake this space up. I have loved it as-is since we moved in, but I just wanted to freshen it a bit, you know? I know there is a lot out on the web for how to decorate for less, but I still want to share how I refreshed this space for $75. You can create a lot of impact with a little!

First, here is what I spent at a glance:
Thrifted mirror: $20
Thrifted file cabinet: $20
Thrifted accessories: $10
Plants & containers: $25

The theme here is thrifted. It took me a couple months to gather these items, and each time I walked into a thrift store I tried to just look around with an open mind. I had measured the heights of my shelves so I wouldn’t get anything that didn’t fit, and knew I wanted a couple interesting shapes. Other than looking for a wood file cabinet that I could refinish, and a large mirror, I was pretty open to items that simply stood out for the shelves.

Now

DSC_0954.jpg

All accessories here are thrifted accept the art! The trees print was on clearance at Target, and the abstract on the bottom shelf was a GIFT. I still can’t believe it. Our sweet friend Melissa is a talented abstract artist using the most unusual techniques, (like avocado oil, thread….she never ceases to amaze me). Her work is so striking but even more so is her heart behind her work. You can find out more about her and her work here if interested!

DSC_0960.jpg

While Craigslist, Facebook, and thrift stores are busting with file cabinets, I really wanted a wood one with brass hardware that I could refinish. I finally found this one and grabbed my black chalkpaint, (by Valspar at Lowes!), the same day! It was a quick afternoon job and I love how it turned out. Our basement doubles as office space and so I figured our functional file cabinet could at least serve as a cute end table, too. At the end of the day it’s still just a file cabinet. Not my favorite piece of furniture, but it doesn’t bother me as much in this matte black finish.

DSC_0966.jpg
DSC_0963.jpg

I really don’t care for excessive decorative pillows, (they get sat on and thrown on the floor in this house), so when I want to change things up I prefer to ‘shop my house’ and steal from other rooms. All of these pillows have been around for a while in various rooms,, and I’ve discovered that 20x20s or 22x22s are our magic size for our TV lounging sofa here. Anything smaller just doesn’t work for us.

DSC_0977.jpg
DSC_0973.jpg

Two tricks I’ve discovered when styling shelves with a lot of books: 1) Break the books up into stacks and mix in with small accessories. Have a row of vertical books on one shelf, then a few stacks of horizontal books on another. Shelves of JUST books can feel a lot like college again. 2) If you’ve got books with covers offensive to your eyes, take em’ off. Matt’s Harry Potter set was sticking out like a sore thumb to me. I just like more muted tones, when possible. So I took the neon covers off and prefer the naked bindings, (top left).

DSC_0969.jpg

Mixing in a plant or two here and there is another great way to break up books.

DSC_0971.jpg

Our TV has sat on the same refinished/converted dresser I thrifted 8 years ago. I think this piece was less than $20! It’s not my style now, but it also doesn’t bother me one bit! We’ve definitely got a few pieces like that that aren’t what I would pick now, but also just don’t bother me to the point of urgeny to replace.

DSC_0980.jpg
DSC_0978.jpg

This desk Matt built along our stairs is as useful as it looks depressing. He settles here when he has work to do from home - I can’t do it. Hah! But it’s a great way to make use of a nook in a small home.

DSC_0982.jpg

That’s a wrap! Hope you feel empowered to shop used or even around your own home the next time you’re looking to refresh a space. It’s always a great place to start. And a can of paint doesn’t hurt, either!

Thank you so much for coming by today! Have a wonderful weekend!